
If you wish to join in and have not seen the other blogs then go to Neets Blog /www.hickydorums.blogspot.co.uk/ leave a comment and follow the links to all the other blogs.
Good luck to everyone in the draw.
Well here is a picture of my project incorporating a stamp from the heartfelt poinsetia range and the distressed holiday collage die from Memory box.


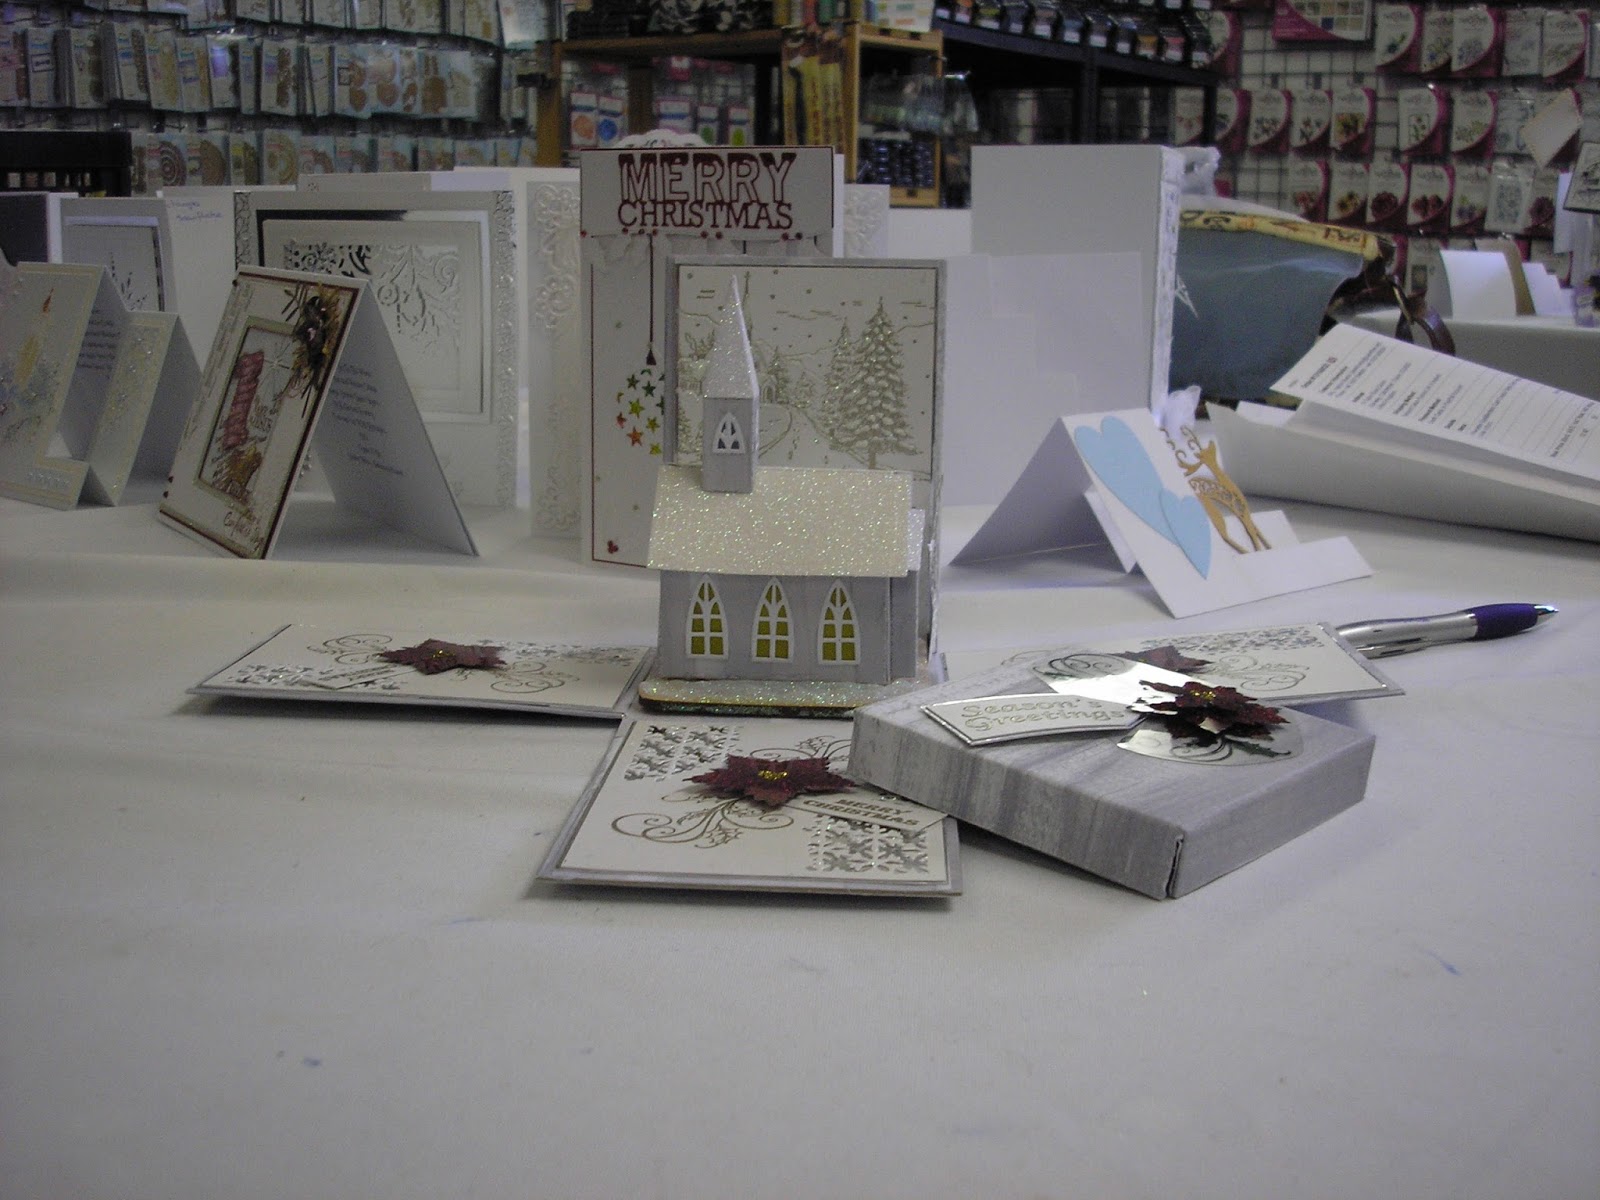

I thought the best way to show how I made it was to take photos along the way. A picture is worth a thousand words and this blog is long enough!
First thing was to make the box. For this I used thick card taken from the back of writing pads.
I cut 5 pieces for the box,
4 pieces 53/4 inches x 4 inches
for the sides
1 piece 4 inches
x 4 inches for the base
5 pieces for the Lid
1 piece 41/8 inch x 41/8 inch
4 pieces 41/8 inch x 3/4 inch.
I then covered these using the 6" x 6" papers from the Amy Design Brocante Christmas pad. I used the papers to form hinges.


I covered the base first by placing the 4x4 card in the centre then placing the sides around, making sure I left space for the paper to act as a hinge hinge. I cut the paper in each corner and stuck to the inside


I then covered the sides


I then repeated the process with the lid, but joining the corners.
I then made the acetate embellishments by stamping the image from Sparkling poinsettia Swirl on to acetate with black stazon ink.

I flooded each area with clear art institute glue and covered with the glitter and left to dry overnight.


When dry these were attached to the outside of the box and lid using Pinflair 3d glue. I cut out and layered more of the poinsettia to give a little dimension. Stamp and Emboss a tag using Honey Doo stamp and add to the lid


I made three identical panels for the inside of the box by cutting the memory box distressed holiday collage from top left and bottom right of pearlescent paper cut to size. I then part stamped the heartfelt Sparkling poinsettia Swirl with versamark embossing ink in top right and bottom left corner of the panel then and embossed with wow silver embossing powder. To apply ink to part of the stamp I cover the part not needed wih a piece of copy paper.


I then matted and layered on to silver card. I then used same technique as above to make flowers and added them to the centre of each panel. I made greeting tags for each panel using Honey Doo stamp Seasons Greeting stamps.
For the back panel I stamped and Embossed the Penny Black Snowy Hamlet stamp, then matted and layered on to silver card.


I then cut out brackets using the Distressed Holliday Collage die. I cut around the edges leaving tags to stick to them to the box. I stuck the tags to the back and base of the box as shown (sorry no original photos so example used) to prevent it falling back. I then placed the side and back panels in place to cover the tags.
The Chapel was made from the Spellbinders Guilded life Beacon Street Life Chapel. I cut out the components using the die then I used double sided glue sheets to apply Glitter to all of the roof parts. I joined the pieces together to form the chapel and placed some coloured velum inside the windows to give a stained glass effect. I placed this on to the coaster on the front side only to allow a flameless tea light to be placed inside.


I then used viva glitter-paste to add a snowy effect to the coaster. leave overnight to set then this can be glued to the inside of the box.


I do hope you have enjoyed taking part in the Oyster stamp Blog hop. The winners of the prizes will be published on each of the blogs in due course.
Good look and thank you for taking the time to look through all of the blogs. I think you will agree we have some very talented designers on the Oyster Design Team.
Take Care
Janet
Complete list for blog hop if you missed any
Complete list for blog hop if you missed any
Neet Saturday 29th August
http://www.hickydorums.blogspot.co.uk/
Pam Sunday 30th August
http://pam-simcrafts.blogspot.co.uk/
Martine Monday 31st August
http://abfabdesigns.blogspot.co.uk/ ( YOU ARE HERE)
Hellen Tuesday 1st September
http://www.elliescupboard.blogspot.co.uk/
Margot Wednesday 2nd September
http://margot-craftcorner.blogspot.co.uk/
Andy Thursday 3rd September
http://www.andrewbennett17.blogspot.co.uk/
Eileen Friday 4th September
http://eileenscraftyzone.blogspot.co.uk/
Marianne Saturday 5th September
http://mariannescreativeworld.blogspot.co.uk/
Kerry Sunday 6th September
http://kerryscraft.com/
Barbara Monday 7th September
http://iveartinmysoul.blogspot.co.uk/
Theresa Tuesday 8th September
http://redobsessioncards.blogspot.co.uk/
Zoe Wednesday 9th September
http://zoeblingcards.blogspot.co.uk/
Janet Thursday 10th September
http://dottyscraftyantics.blogspot.co.uk/
WOW! What a stunning project to finish off a great blog hop! Thank you for the detailed instructions. xx
ReplyDeleteStunning project Janet! what a finish to the blog hop!!!
ReplyDeleteGreat tutorial.
Hugs Pam x
Wow that's amazing and a stunning finish to a most enjoyable blog hop. I've been very impressed by the many varied and beautiful ways that the stamps and dies have been used. Thank you for sharing today, Janet and thank you everyone on the team for taking part and sharing your projects and techniques. Hugs Jeanette xxx
ReplyDeleteWow as they say ,leave the best to last .
ReplyDeleteGreat work and fab tutorial Janet.
Martine xxxx
Wow! These are amazing projects Janet, stunning xx Zoe xx
ReplyDeleteWow wow wow, what a beautiful little church. That is stunning and a great tutorial as well, ur other cards are beautiful as well, just love the poinsettia flowers xx
ReplyDeleteBeautiful and a brilliant tutorial, thank you xxx
ReplyDeleteFantastic project and great step by step instructions - thanks, Susan x
ReplyDeleteWOW - this really is beautiful - you make it sound so easy in your instructions - but I doubt I'd ever be able to put something like this together - though this does make me want to have a go - I don't always follow blog hops but I am so glad I followed this one - I've seen some amazing work - and will be revisiting so many of these blogs - now that I've found them. Thank you to all of the bloggers involved for sharing your talents!
ReplyDeleteHi jan, saved the best tell last, lovevthe church, seen it in real life, a masterpiece. Hugs, june smith xxx
ReplyDeleteHi, love that church, its so good, all your projects are lovely and so nice to have lots of photos of step by steps.x
ReplyDeleteÀnother beautiful project useing the stamps and dies in this bloghop well done Janet xx
ReplyDeleteBeautiful Janet and what an fabulous end ..... Loved your little Church very much.... Marianne xxx.
ReplyDeleteHi Janet, This is absolutely stunning, stunning, stunning. I love the piccies of all your creations here, and the Chapel is absolutely stunning.
ReplyDeleteLots of love from Patricia xx
A lovely project Janet and great to have instructions too. Kx
ReplyDeleteWow Janet this is absolutely amazing work. What a wonderful project and I really enjoyed seeing your photos of the process. Barbxx
ReplyDelete